

Hello everyone! I know there are a lot of you out there frantically making home sewn PPE (personal protective equipment) and there are certainly a TON of face mask patterns available now, but when my step-mom, who is a nurse, asked me about sewing her a scrub cap, I found it very difficult to find a good pattern that fit all of our needs. My criteria for the pattern was that it be quick and easy to sew, durable, use a small amount of fabric and it needed to be FREE.
If you don't have access to a printer, there are some tutorials available on YouTube that walk you through drafting your own, like this one from Darrell Thomas which is great, but I wanted to create my own pattern with a few more features that I could make available to YOU!


Features:
- A reinforced, partially interfaced band so you can sew on some buttons to keep the mask elastic off of your ears.
- Faux flat felled seams for a more durable finish that holds up to being washed constantly.
- Bar tacks to reinforce areas that see a lot of wear and tear.
- Elastic back for best fit (**I do understand that narrow elastic is hard to come by these days, please see the instructions for more information on how to sew it without**)
- Quick and easy to sew.
- Easy to print and assemble PDF pattern on only 3 pages.
- Uses very little fabric! 2 caps can be made from 1/2 yard of 45" wide fabric.
- Adjustable, one size fits most. (If you find the cap to be way too big, you can try printing it at a slightly smaller scale, or larger if its too small.)
I know we all have a lot on our plates right now so I'm going to get straight to the sewing part. I know that's the real reason you are here. Here's what you will need:

- Cotton fabric such as quilting cotton or poplin. Any of these would work. 1/2 yard will get you 2 caps.
- Free Simplifi Scrub Cap Pattern available HERE.
- 6" of 1/4" or 3/8" wide elastic (This elastic will be completely enclosed so I used 3/4" elastic and cut it down to size. **SEE STEP 6 FOR AN ALTERNATIVE METHOD**)
- Matching thread.
- Optional: small scraps of interfacing.
Sewing the Cap.
All seam allowances are included and measure 1/2" unless otherwise noted.
Step 1. Print and cut out your pattern pieces.
Step 2. Cut out your fabric. Note that the side panel is cut on the fold! Make sure to snip in the the side panel along the fold (about 1/8" in) to mark the centre front at the op and bottom and snip the top piece at the CF mark. Don't forget to also cut a band piece which is not included in the pattern pieces. The band measures 3" x 35" but if your piece of fabric is smaller cut the band in 2 pieces measuring 3" x 18" each.


Step 3. With right sides together, pin your side panel piece to your top piece starting by pinning the centre front and ends, and then easing in the rest of the curved edge. Stitch. Finish your edges in your preferred method; serging, zigzagging or using pinking shears.


Step 4. Press your seam allowance towards the side panel. Create a faux flat-felled seam by topstitching approximately 3/8" away from the seamline on the side panel making sure to catch your seam allowance in this line of stitching. This step is optional but I highly recommend it because we want this cap to be very durable and stand up to lots of washing!


Step 5. Turn 1/4" to the wrong side of the assembled cap along the back straight side and press. Turn under another 1/2" and press. Edgestitch along the first fold to create a casing for the elastic.


Step 6. **If you do not have access to any elastic a scrap piece of stretchy material such as jersey, spandex or lycra can be used in its place. Cut a piece of stretchy material 6" x 3/4". I recommend using something with a high stretch percentage and with good recovery. Fold this rectangle in half lengthwise and press. Substitute for elastic and continue with the steps as follows**


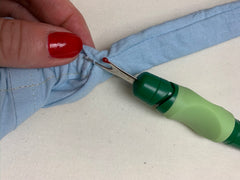
Using a safety pin, bodkin, or in my case a bobby pin, thread your elastic in to the casing until the loose end of the elastic is just flush with the edge you started at. Stitch across the elastic 1/2" from the edge to secure. Backstitch a few times.


Step 7. Continue to thread the elastic through the casing until it emerges out the other end. Your fabric will begin to gather up. Pull the elastic out by about 1/2" and stitch across the elastic and casing 1/2" from the edge to secure. I like to keep my (bobby) pin attached while I do this step just in case I accidentally let go. This way if the elastic springs back in to the casing, I am still able to grab it and thread it through. Trim the elastic flush with the casing.

Step 8. If you cut your band in two pieces, sew them right sides together along one short end. Press this seam open.


Step 9. *This step is optional but if you wear a mask with elastic that wraps around the ears, large buttons attached to the band can be used to loop the elastic around, keeping the pressure off your ears. This interfacing will reinforce the area of the band where the buttons will go, making them sturdier and more secure.
Cut 2 pieces of interfacing 3" x 4" and fuse them to the wrong side of the band piece approximately 5" from centre front on both sides.

Step 10. Press the band piece in half lengthwise with right sides together. Open the band piece back up and press one long edge to the wrong side by 1/2".


Step 10. With right sides together, pin the unfolded edge of the band to the side panel, matching centres. Stitch.


Step 11. Press seam allowance towards band and press seam allowance of the edge of the band that isn't stitched to the wrong side by 1/2".


Step 12. With the right side facing you, unfold your pressed band and fold your cap up and out of the way. Fold your band right sides together so that the long edges match and pin.


Step 13. Starting right at the edge of the cap, begin sewing the rest of your band pivoting at the corner and sewing to the folded edge. Backstitch.


Step 14. Clip your corners and using a point turner, chopstick or knitting needle turn your band right side out and press.


*If your cap is bunched up inside your band and doesn't lie flat, simply rip out a few stitches along the band until it sits flat.

Step 15. Fold your band along the crease you made earlier and line up the folded seam allowance just over the stitch line. Pin in place.


Step 16. From the right side, starting on the end of one of the ties, edgestitch all the way around the band pivoting at the corners and finishing back where you started making sure to catch all layers as you go.


Step 17. Sew a bartack where the cap meets the band sewing through all layers including the elastic. This will reinforce this area of strain.

Voila! You are all done! Simple and effective. This is a great pattern for batch sewing and it is helpful to have a few so that you can always have one available when the others are in the wash!
If you are a healthcare worker during this time, we want to say a very big THANK YOU. If you are not in healthcare, but are sewing caps for the frontline workers we also want to say THANK YOU! Please tag us with #simplifiscrubcap so we can see your makes and say thank you personally!
Please take care of yourselves and others!
Thanks for stopping by. xo M
Here is a photo of my step-mom (left) wearing her Simplifi Scrub Cap. She says she's been getting lots of compliments and it washes very well!

5 comments
I tried five or six other patterns before l founds yours. This is by far the best and easiest one so far. It also takes less fabric than many others l tried. l have made 265 scrub hats, most with this pattern. Great feedback from both doctors and nurses on the fit. Thank you for a great pattern.
I love this pattern!
I’m on to making #12, but I continually get confused at step 10 (the first step 10) where the instruction conflicts with the photo… I press the band together with right sides together, then it says to press 1/2" to the wrong side, but the photo looks like the 1/2" is pressed in toward the crease, not away from it, to the wrong side? My band looks like a square root sign from the other end, but I’m thinking it should look like a lop-sided triangle.
Thanks again for this pattern!
Thank you! Great pattern but I am having trouble. Is there somewhere I can go to get more instruction on this pattern?
I wamt to sew get me some info 905-877-8010
You make me sooooo proud Merrill. I love telling my colleagues that you’ve made this.
This took a lot of work and the presentation is so professional
Xxx.
Much love
Susan